 |
| ActionBarCompat on Nexus One running Android 2.3.6 |
- New a Android Application Project as normal.
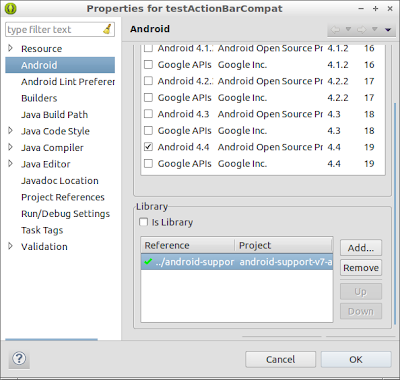
- Right click on the project, select Properties, select Android tab on the left box, scroll down on the right to make sure the check box of "is Library" is un-checked, and click the Add button to add library of "android-support-v7-appcompat". then click OK.
 |
| add library of android-support-v7-appcompat |
<?xml version="1.0" encoding="utf-8"?>
<manifest xmlns:android="http://schemas.android.com/apk/res/android"
    package="com.example.testactionbarcompat"
    android:versionCode="1"
    android:versionName="1.0" >

    <uses-sdk
        android:minSdkVersion="8"
        android:targetSdkVersion="18" />

    <application
        android:allowBackup="true"
        android:icon="@drawable/ic_launcher"
        android:label="@string/app_name"
        android:theme="@style/Theme.AppCompat" >
        <activity
            android:name="com.example.testactionbarcompat.MainActivity"
            android:label="@string/app_name" >
            <intent-filter>
                <action android:name="android.intent.action.MAIN" />

                <category android:name="android.intent.category.LAUNCHER" />
            </intent-filter>
        </activity>
    </application>

</manifest>
- Modify menu resources file, /res/menu/main.xml.
Add a new xmlns, xmlns:myapp="http://schemas.android.com/apk/res-auto". You can choice any name (myapp in my example) you want. But it has to be matched with the name space in
Modify
<menu
    xmlns:myapp="http://schemas.android.com/apk/res-auto"
    xmlns:android="http://schemas.android.com/apk/res/android" >

    <item
        android:id="@+id/action_settings"
        android:orderInCategory="100"
        myapp:showAsAction="always"
        android:title="@string/action_settings"/>

</menu>
- Modify MainActivity to extend ActionBarActivity with android.support.v7.app.ActionBarActivity imported.
package com.example.testactionbarcompat;

import android.os.Bundle;
import android.support.v7.app.ActionBarActivity;
import android.view.Menu;

public class MainActivity extends ActionBarActivity {

    @Override
    protected void onCreate(Bundle savedInstanceState) {
        super.onCreate(savedInstanceState);
        setContentView(R.layout.activity_main);
    }


    @Override
    public boolean onCreateOptionsMenu(Menu menu) {
        // Inflate the menu; this adds items to the action bar if it is present.
        getMenuInflater().inflate(R.menu.main, menu);
        return true;
    }

}
- Now it can be re-build to generate app with Action Bar running on devices of Android 2.1 or higher.
Next:
- Add MenuItem to ActionBarCompat using Java
Visit: ActionBarCompat Step-by-step
Description: Example of using ActionBarCompat with android-support-v7-appcompat Rating: 4.5 Reviewer: Ringga - ItemReviewed: Example of using ActionBarCompat with android-support-v7-appcompat


0 comments:
Post a Comment